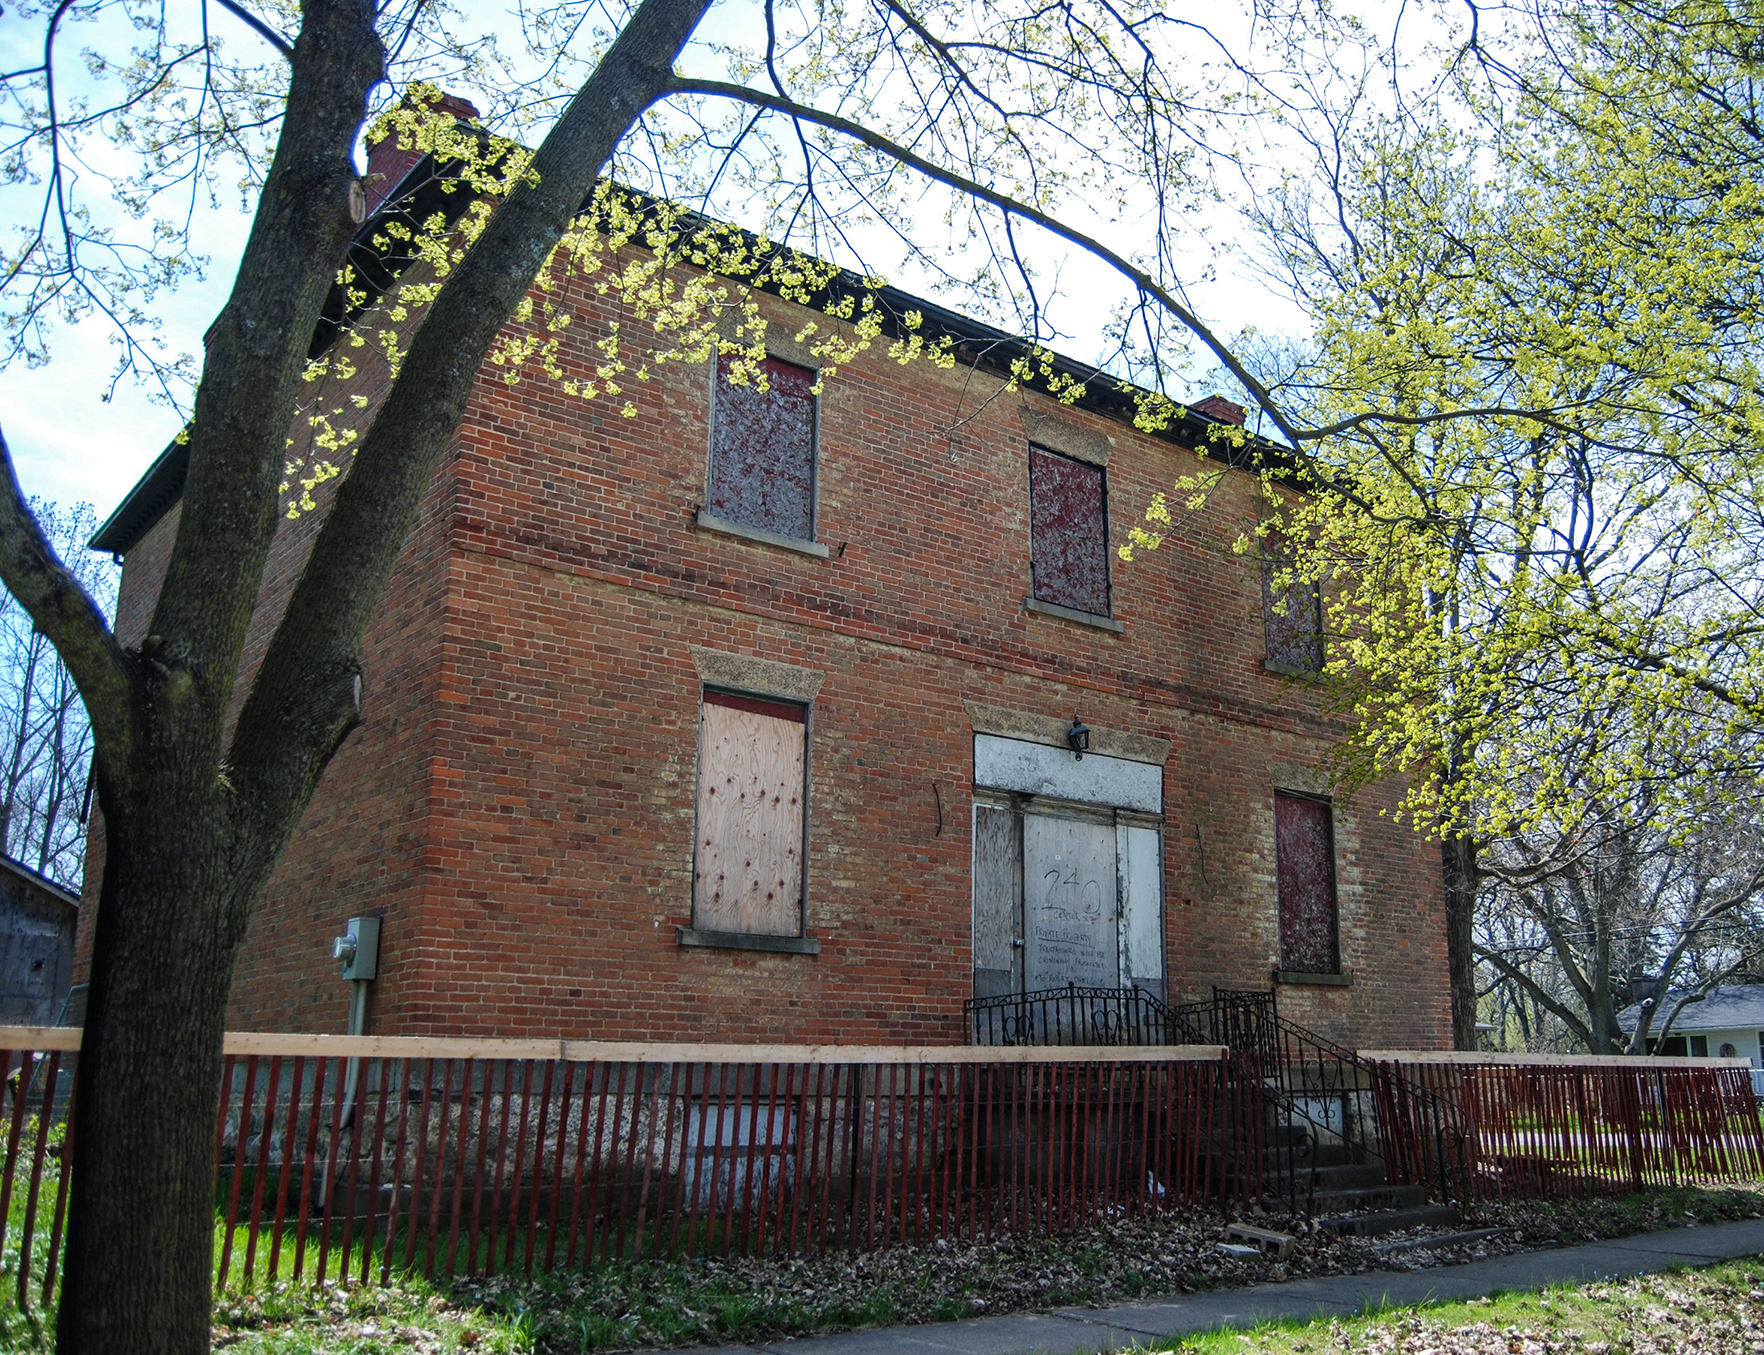
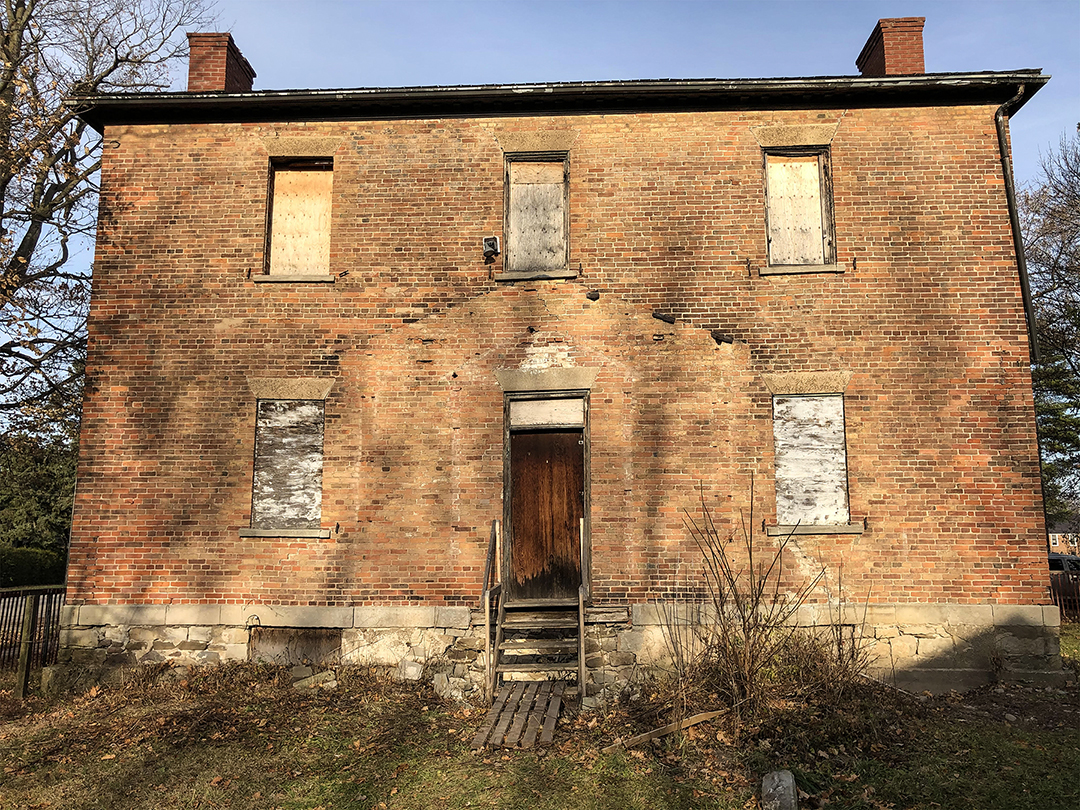
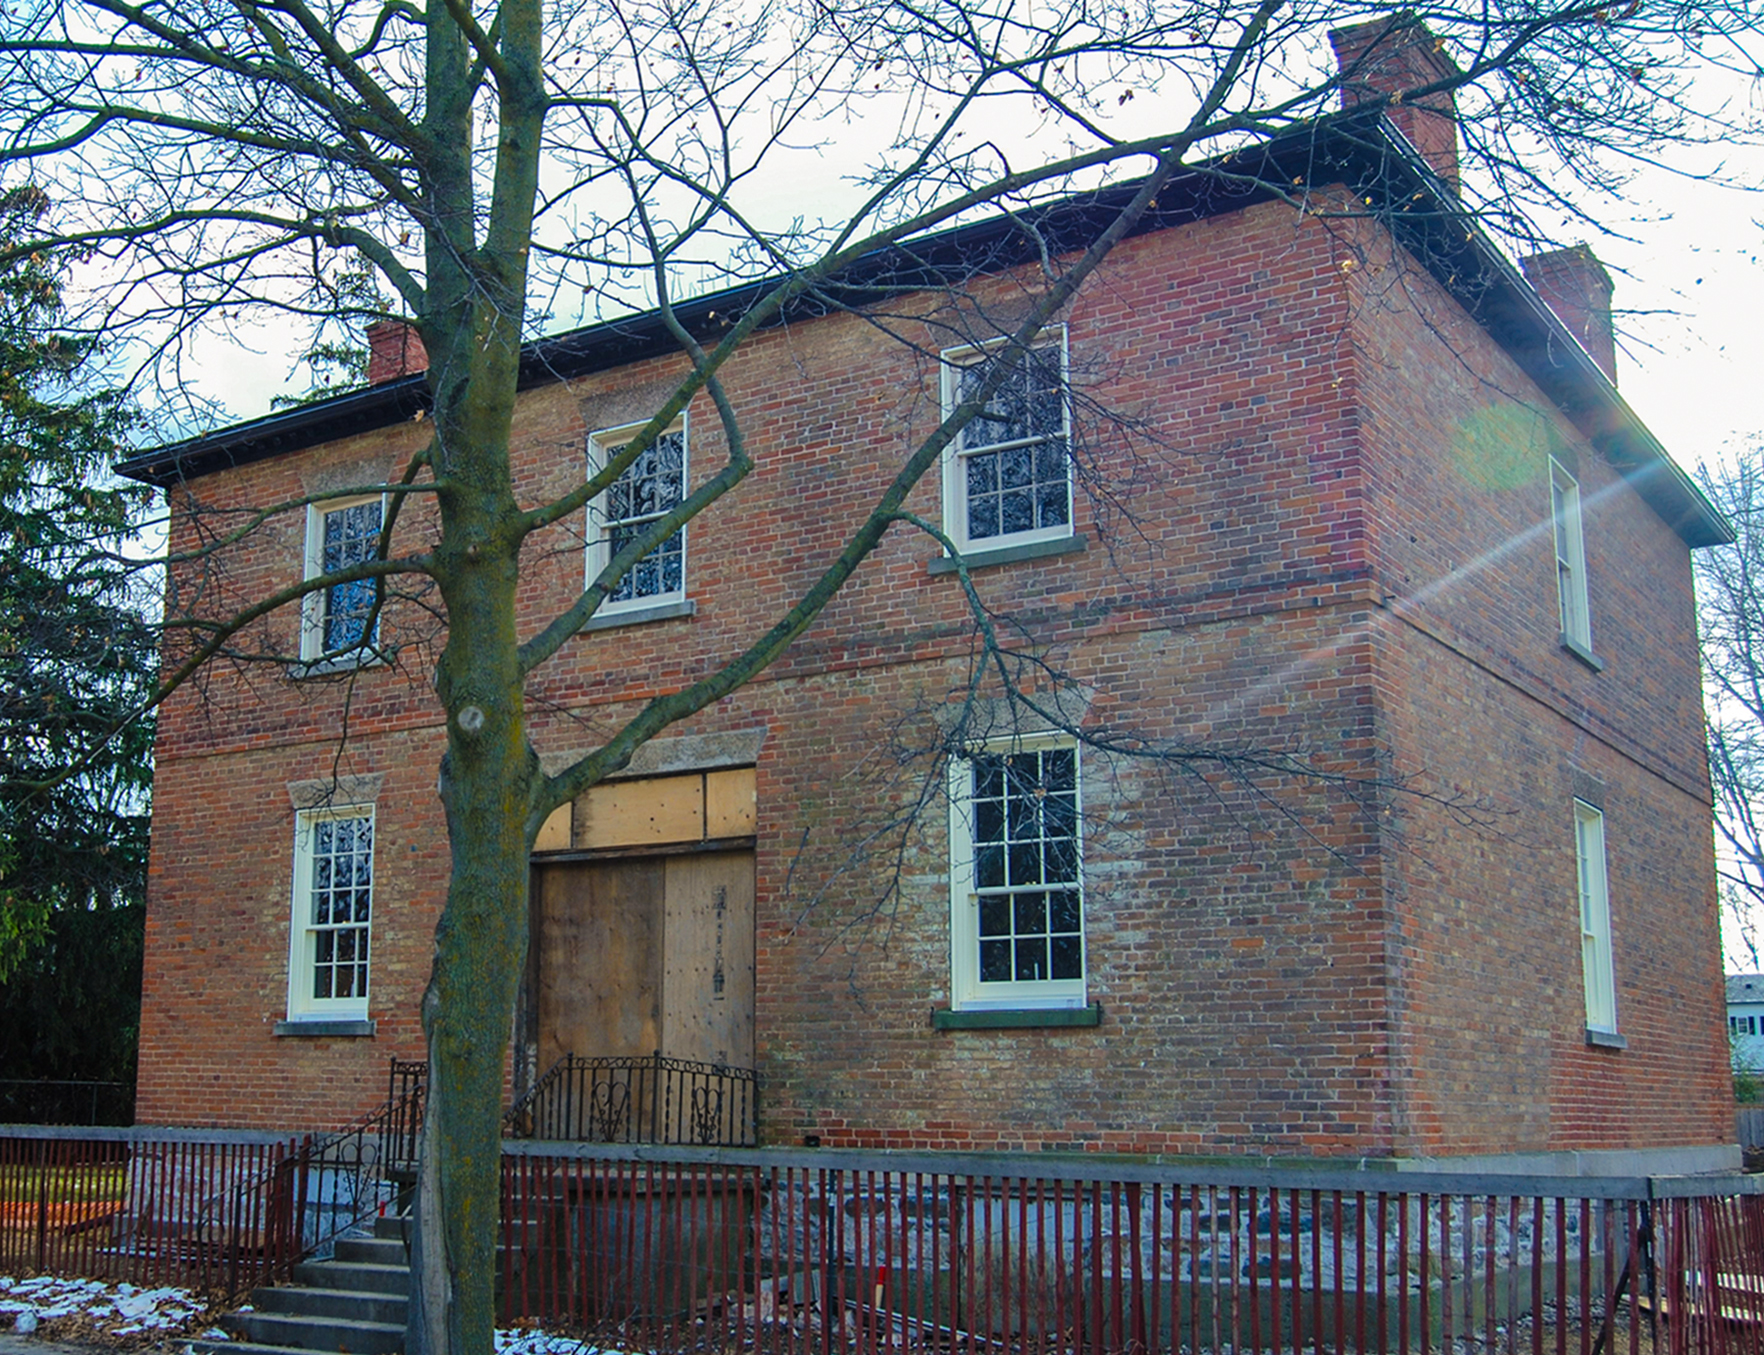
At the Beginning
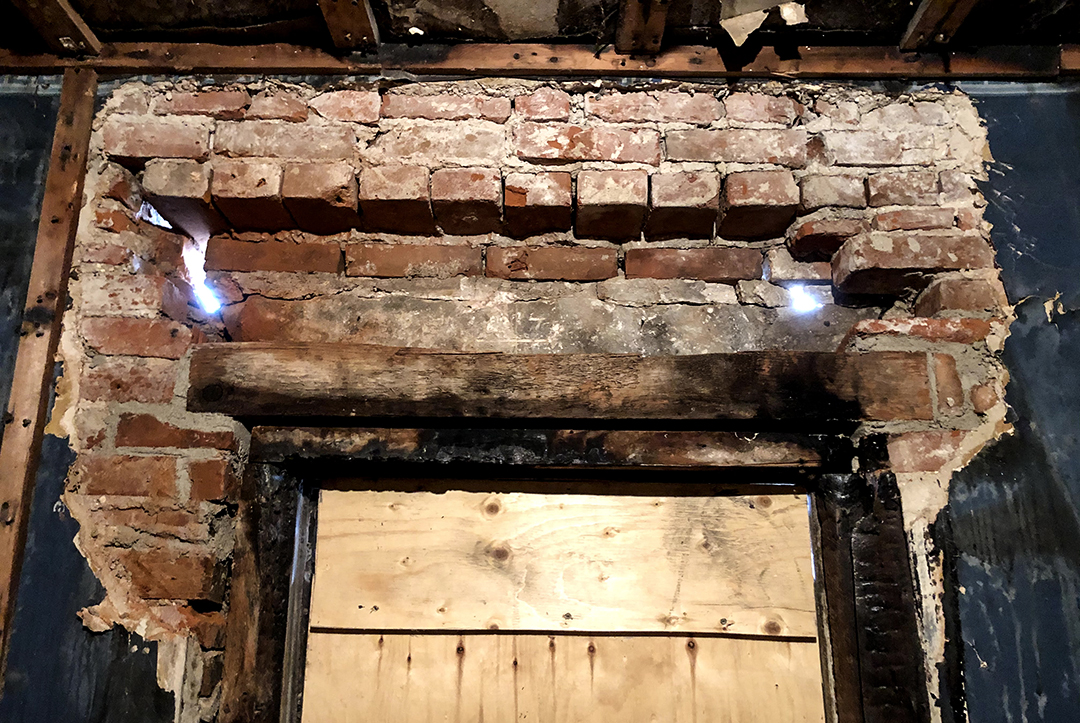
Despite nearly six decades of neglect, deterioration and vandalism, the classic parameters of a beautifully designed Regency home still shone through. The elegant execution of scale, proportion, balance and lines of the home’s design reigned supreme over the boarded-up openings and minimal (read cheaper) 20th Century front stairway. However, the combination of the neglect, some well-intentioned but sadly misinformed early 20th Century ‘modernization’ efforts and several badly executed masonry undertakings had seriously compromised the structural integrity of the building (as seen in both the photo left and the inset photo below). In fact, it was a testament to the skill of the home’s original builders that the structure had not suffered catastrophic failure! The question remained: was this beautiful old survivor too far gone to be saved? To answer that question the owner’s general contractor, Brock Builders Inc., reached out to the consultancy firm Northwind Design who, after extensive analysis, determined it would be a significant undertaking but was definitely possible. So, to rescue what is the oldest surviving, unaltered (above the foundation), 2 storey cubic form Regency home in Niagara (likely in Ontario and possibly in Canada) we had to begin where the 19th Century builders began… with the foundation.
<<< Back to Rare, Unique & Storied Main

First Steps
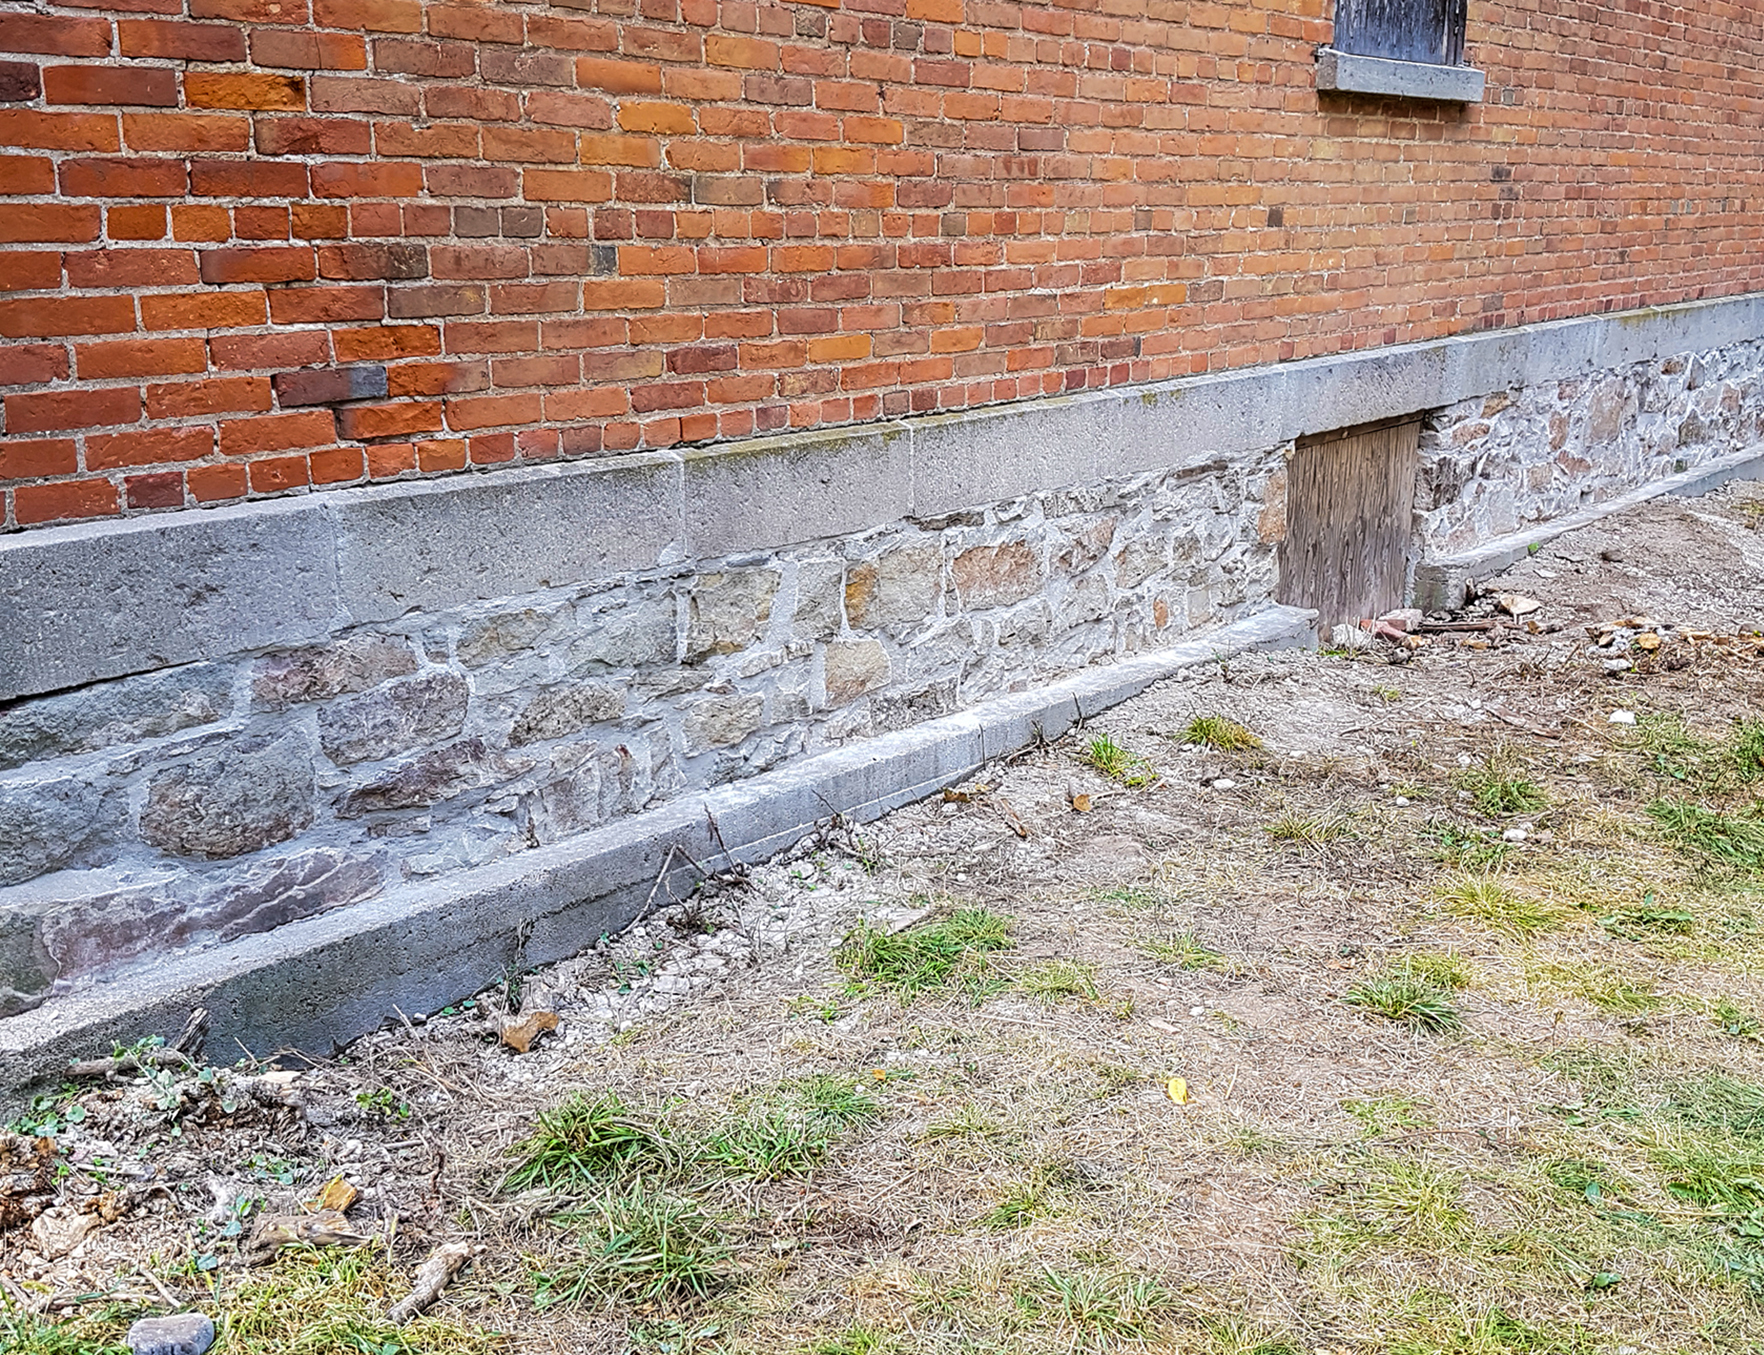
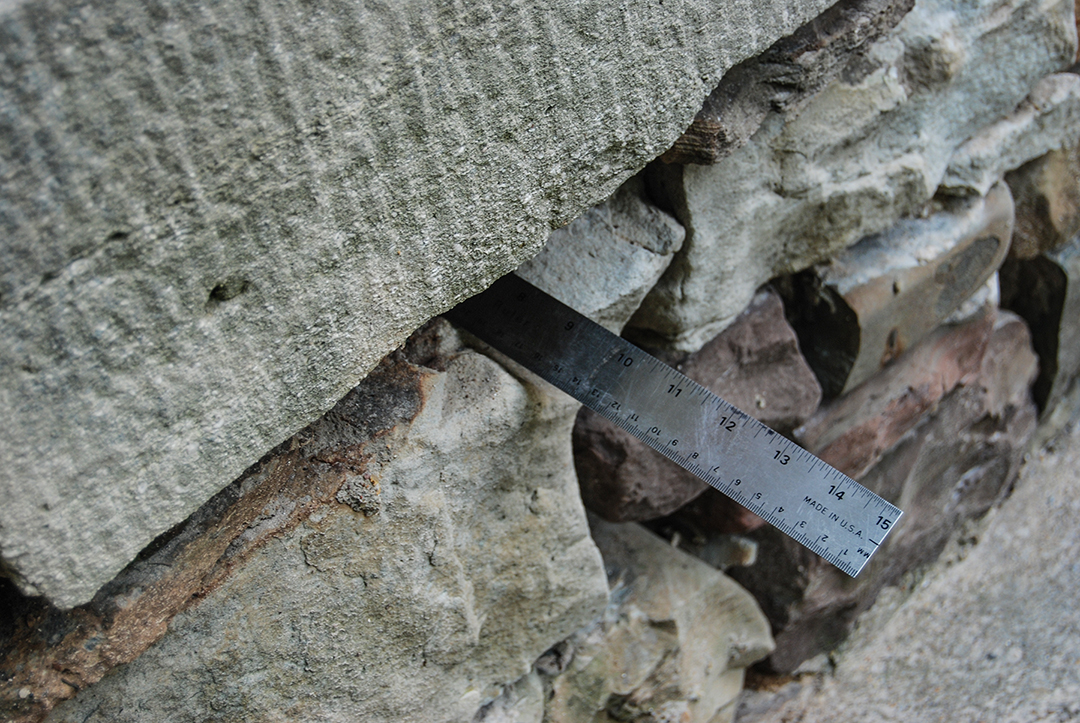
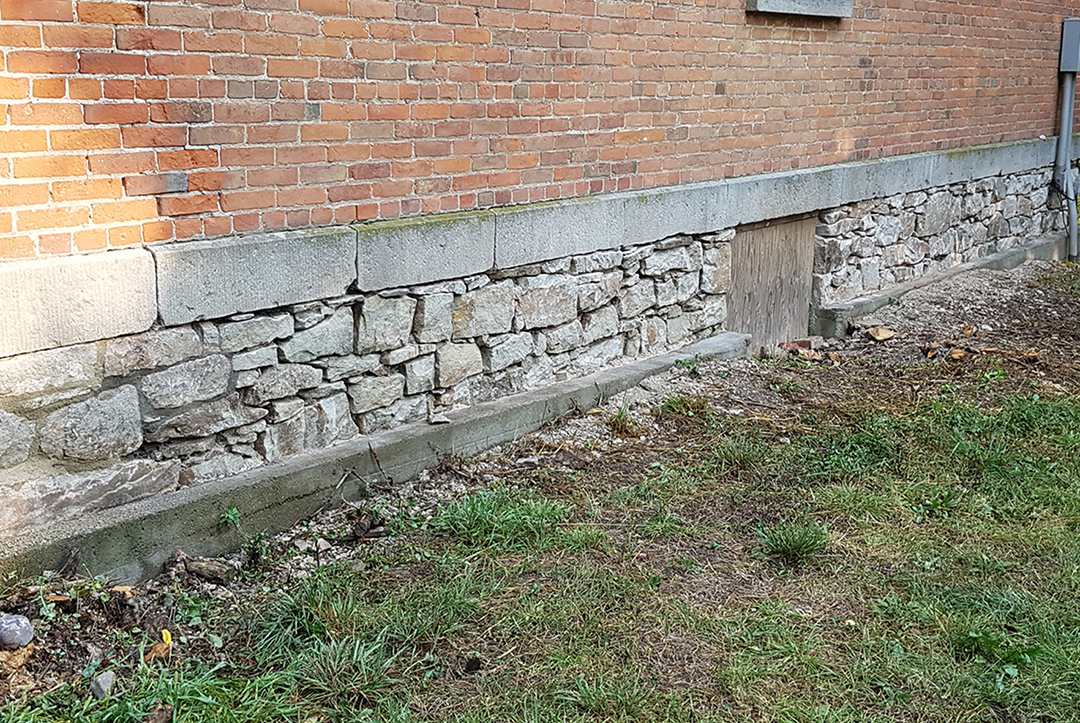
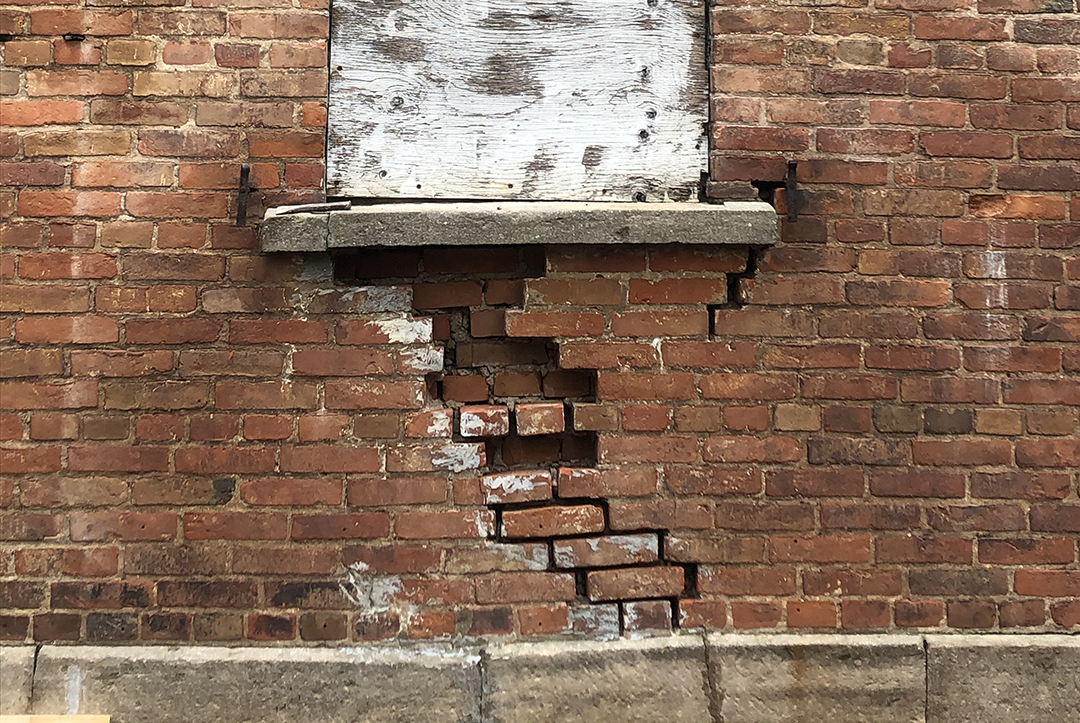
One of the “well-intentioned but sadly misinformed early 20th Century ‘modernization’ efforts” mentioned earlier was the decision by an early 20th Century owner to parge the lime mortared rubblestone foundation with Portland based pebbledash. While the pebbledash did last much longer than the sacrificial lime-based parging that would have been used in the 19th Century, it ignored the fact that a rubblestone foundation of this type requires periodic maintenance. So, for roughly a century, the pebbledash hid the gradual degradation of the mortar. To address this issue, all of the pebbledash was manually removed to uncover the actual state-of-affairs; and it was shocking (click on below for expanded view). Mortar voids were identified that, in places, were up to 10” deep! Specialists in restoration of historic buildings, our Master Masons from Masonry Restoration Canada filled the voids and repointed the entire perimeter with the exception of the area hidden behind the front steps (which will need to be removed pending Town agreements and permits) and the centre portion of the backwall.
<<< Back to Rare, Unique & Storied Main

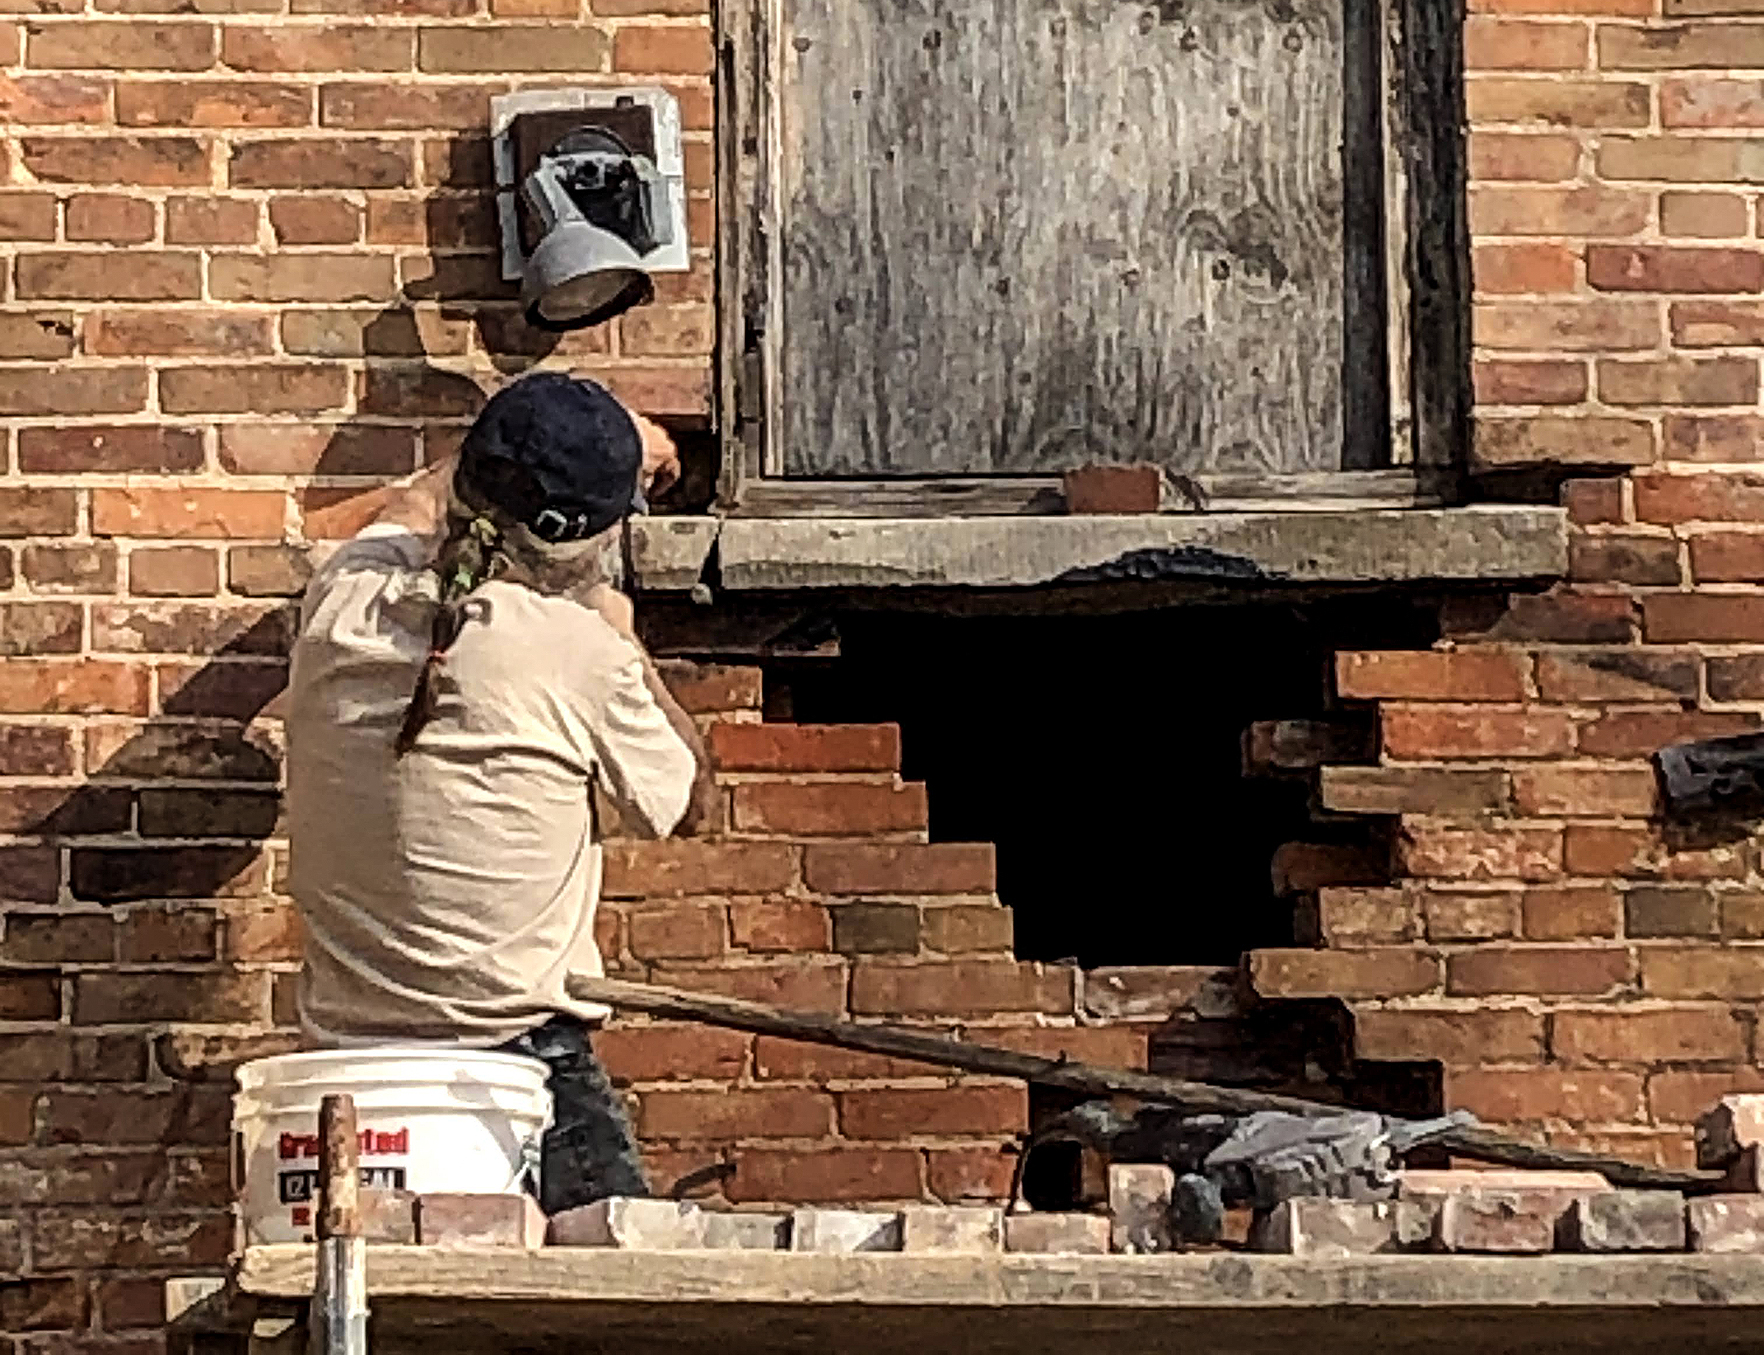
A Critical Affliction
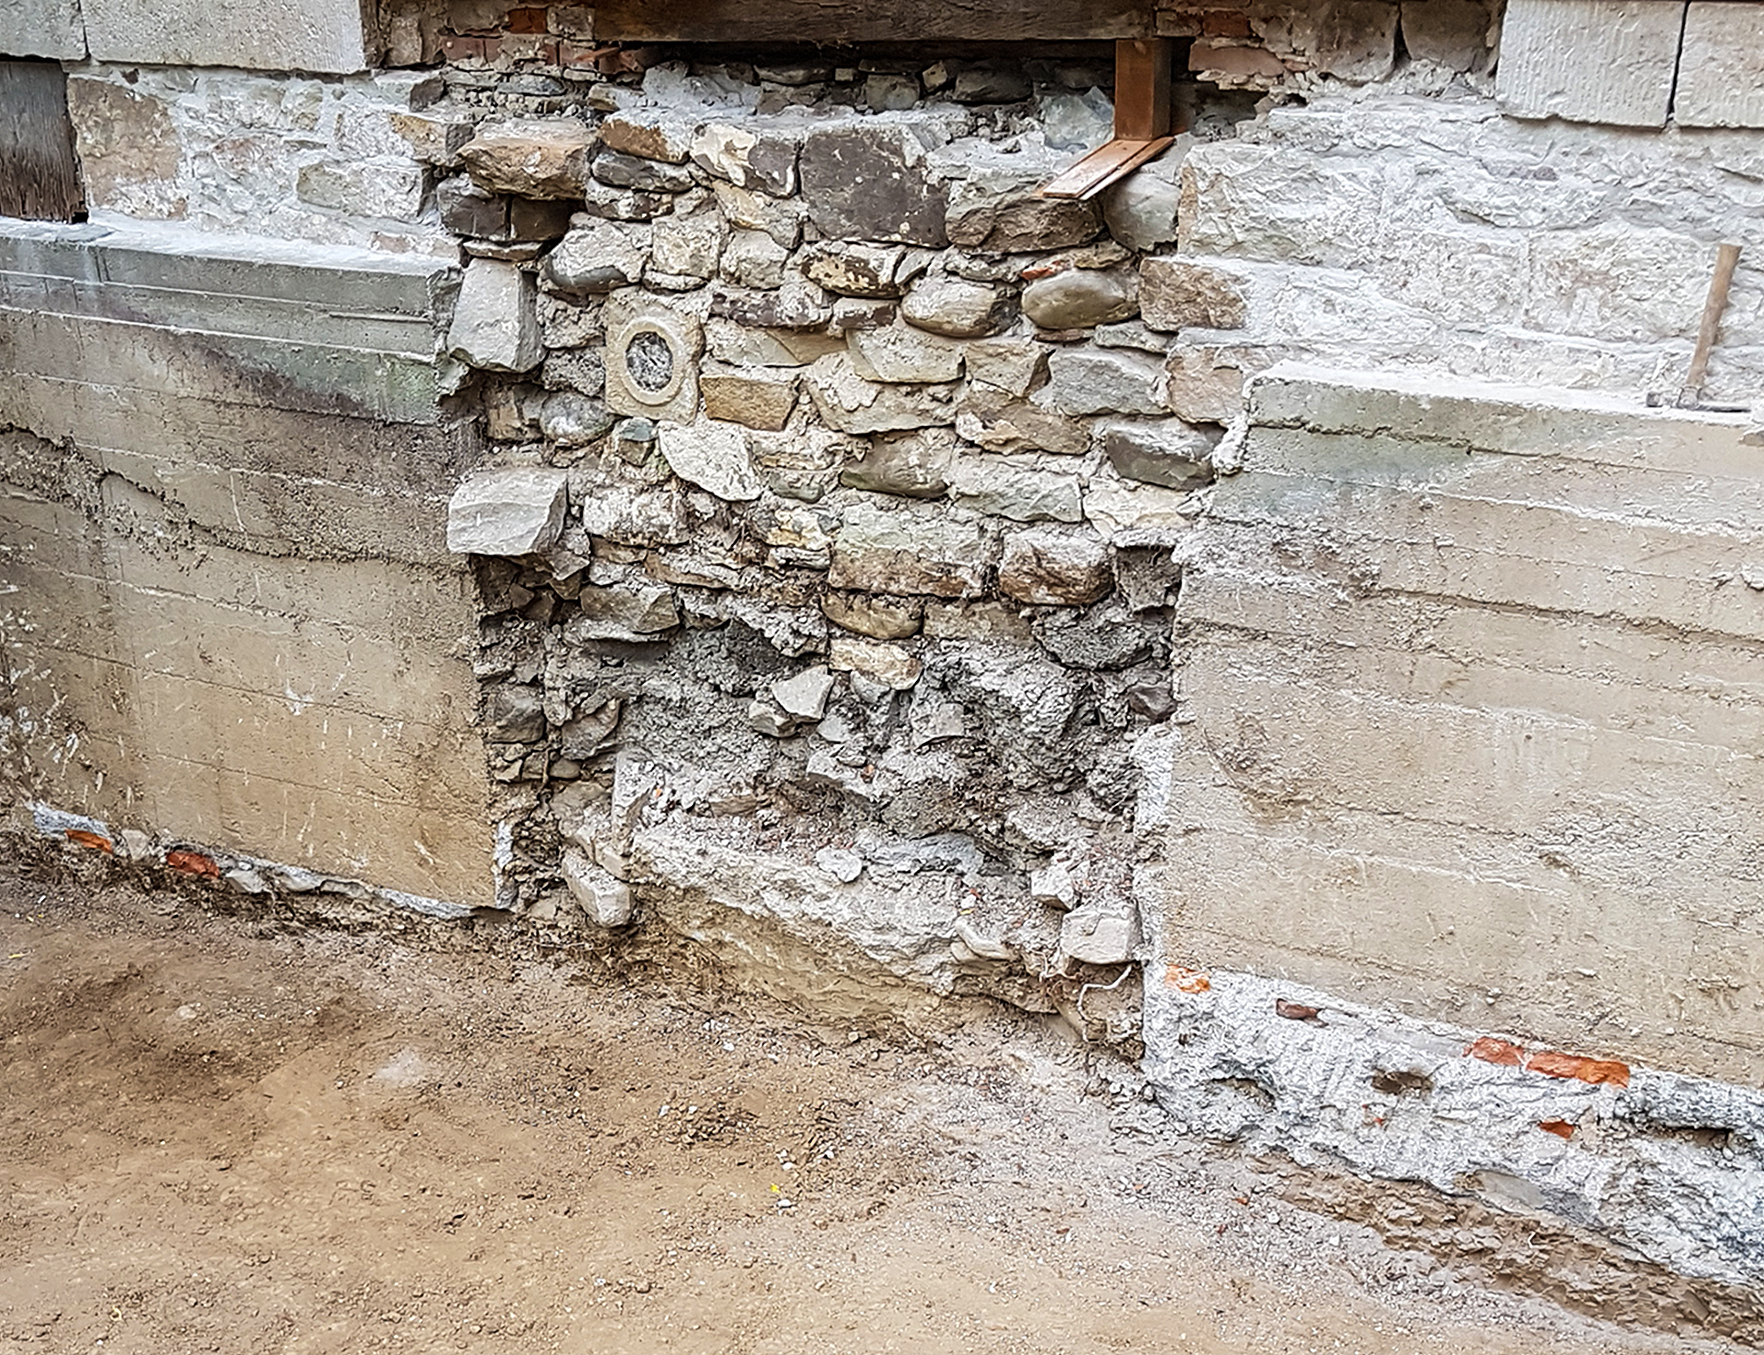
Originally, this home had an exterior basement entry in the rear foundation wall for use by the servants. However, for some unknown reason, the late 20th Century property owner hired a mason to infill this opening. Unfortunately, this mason was sadly lacking in expertise. Not only was the building unsupported when he removed the lintel (causing the masonry above to drop), but his infill solution was a combination of Portland mortared rubblestone and several very poorly prepared Portland cement pours. Over the next few decades, stresses already introduced by the aforementioned drop, combined with and exacerbated by this Portland ‘plug’, resulted in a series of issues across the rear wall’s brick field, watertable, lintels and sills. To address this critical issue, it was necessary to excavate roughly 60% of the rear foundation wall to both access the entire infill ‘plug’ and also to have our engineer and masons assess the stability/strength of the foundation on either side to ensure that the repair would not introduce structural failure. In addition, an opening above the ‘plug’ was prepared to allow the re-establishment of a lintel which will serve to support the brick field during the removal of the infill and the work of rebuilding the correctly mortared rubblestone field around a re-instated entry.
<<< Back to Rare, Unique & Storied Main

Bracing the Foundation
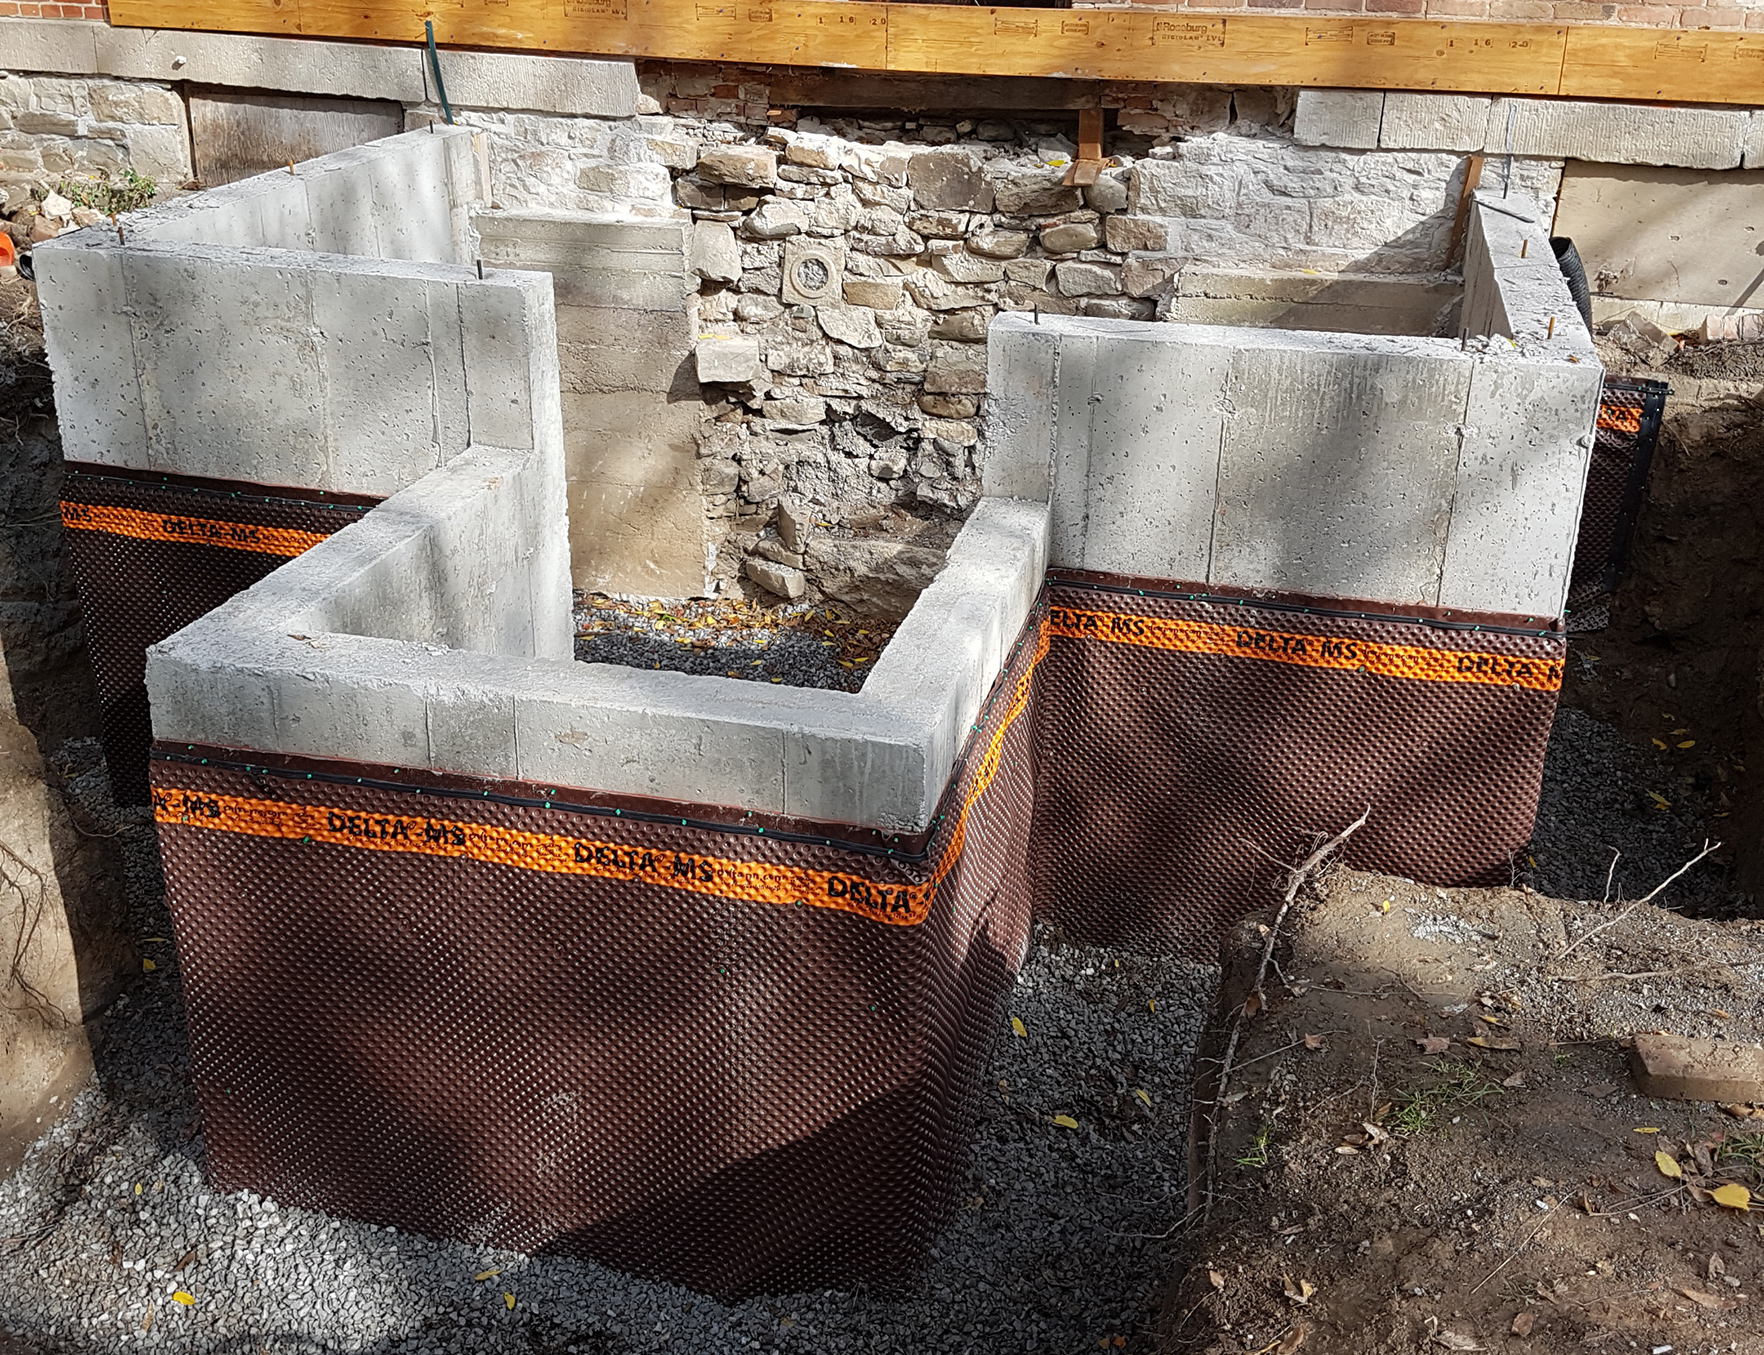
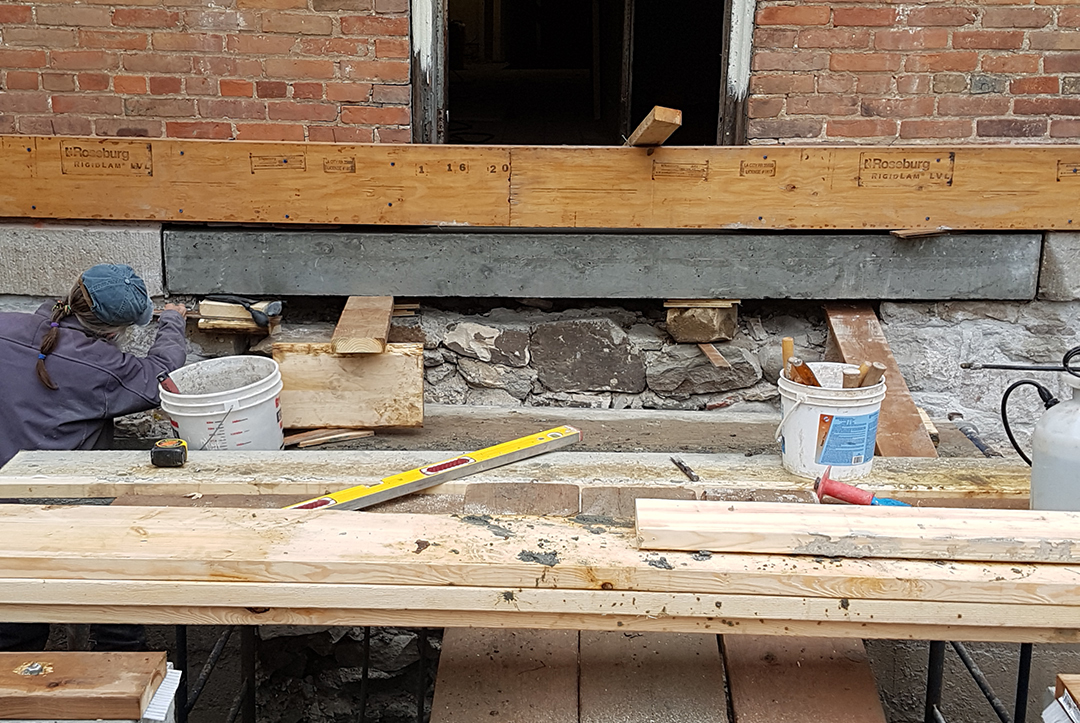
There were several preparatory measures that had to be taken prior to addressing the issue of the ‘portland plug. First, it was necessary to brace the exterior of the rubblestone foundation. Second, a new lintel to support the brick field above would need to be installed in the existing void. Since it was our intention to re-instate the historical opening for a door into the cellar, we designed and poured a multi-functional structure. It would brace the exterior walls of the foundation, act as a retainer to provide access to the basement door and also serve as the foundation for a future porch. Best practices were followed to ensure this new structure was completely self-supporting and not physically tied into the heritage building. A waterproof seal between new and old was achieved using Hydrotite banding. Once this structure was completed, our Master Masons carefully crafted the new lintel in accordance with engineered specifications. Once it was fully cured, the lintel was slid into the existing void and mortared into place; resting atop the rubblestone foundation walls on either side of the ‘portland plug’ and fully supporting the brick field above. Our next job was to stabilize that brick field!
<<< Back to Rare, Unique and Storied Main

Just in Time
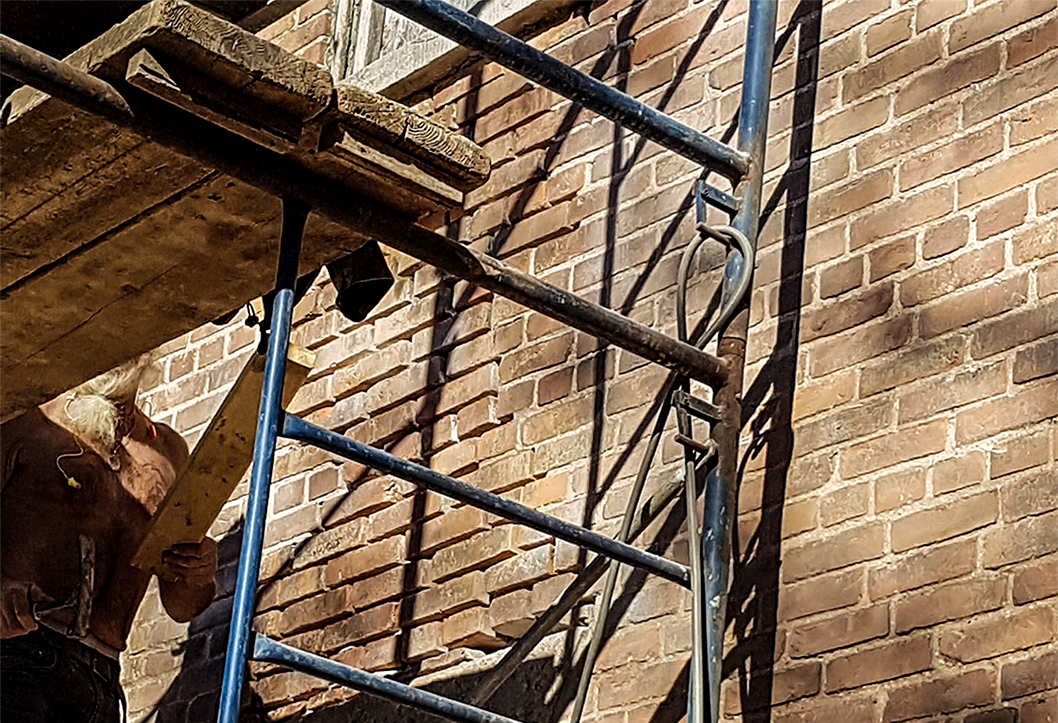
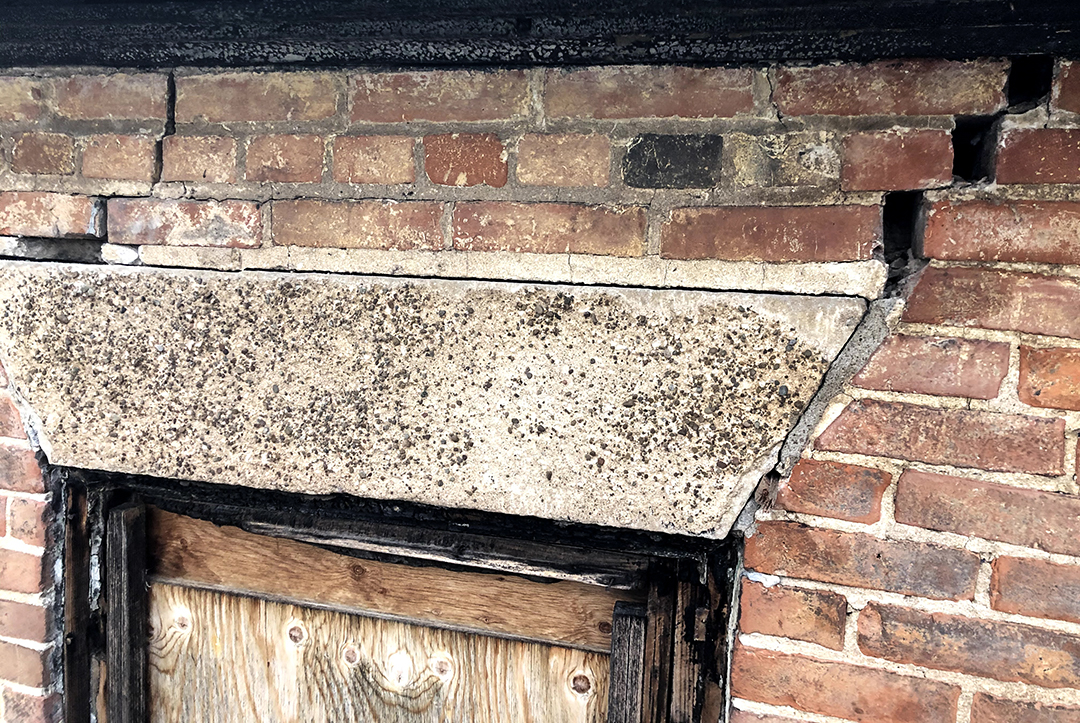
Even for a layman, a single glance at the brick field (particularly on the rear wall) readily displayed the ravages of time and issues caused by past interventions on the heritage structure; the sags, cracked limestone, and mortar step-cracks were obvious. And, while eyes of experts had scanned these fields much more thoroughly, they were shocked by the structural instability encountered as we progressed with our repairs. What appeared to require simple mortar clearing and re-pointing to repair step-cracks caused bricks to fall out of the wall, primary step-cracks extended into multiple structural spider cracks across the field, several failures in the exterior wythe carried clear through to the interior brick wythes, some late 20th Century repointing around the lintels had been done over mid 20th Century caulking material resulting in loss of structural integrity, and the list went on (see inset images for some examples). Even the facade of the building was not exempt from decades of neglect; deep step-cracks from the massive front entry lintel to the ranked window opening above indicated the need for immediate intervention. Our senior Master Restoration Mason observed: “This was caught in the nick of time. Without these repairs, I have no doubt that a major structural failure would have occurred within the year.”
<<< Back to Rare, Unique and Storied Main


Stable & the First
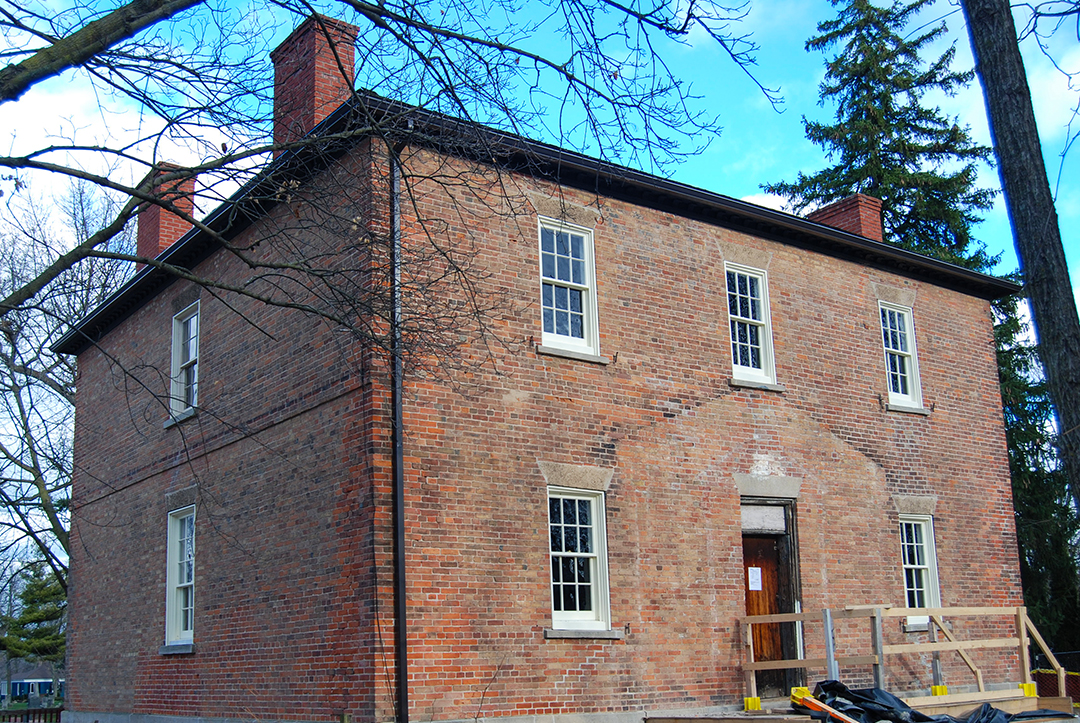
With the exception of the foundation wall section behind the 20th Century front stairs (3 months in and still awaiting permits/etc. from the Town), after weeks of work on the masonry, the foundation and brick fields of the house are finally stabilized. Masonry Restoration Canada has done an amazing job. In fact, a restoration expert who had seen the house before, during and after, commented, “Given the challenges they had to deal with, your masons have worked wonders. I wouldn’t have believed it would come out so well!” And, to safeguard against future water damage to the stabilized brick field, temporary eavestroughs were installed.
While the masons worked, we were staging for our next step: letting daylight back into rooms that had been in the dark for 50 years. Unfortunately, most of the original sashes and frames had not survived and what was in-situ deteriorated past restoration. However, while moving some materials in the barn loft, five reproduction 6/6 window units were discovered. On further investigation it was found that these units had been made for the house in the late 20th Century and never installed; a good thing since the glass which had been used was not restoration quality. We reached out to Willowbank School of Restoration Arts in Queenston and, as it happened, one of their membership had just completed reglazing the windows on the historic John Brown House in St. Catharines and would undertake our foundling sashes. Working with Hollander Specialty Glass, restoration glass of a type and form consistent with the early 1800’s was imported and subsequently mounted. Last week, the first window was trial installed to let the sun shine in!
<<< Back to Rare, Unique and Storied

Let There Be Light
Windows give a building life; the eyes of its soul and a bridge to the world beyond.
For the bulk of the windows on the Breakenridge House, we needed to reach out to a company that had the expertise to produce high quality period-accurate reproductions of the 9/6 and 6/6 originals. Tradewood Industries was not only the best choice, they stood up to the plate and promised delivery in time to have the windows installed before Christmas.
Once again, Hollander Specialty Glass was called upon to supply that beautiful Circa 1800 restoration glass; a vital component in re-creating the windows’ dreamy, decorative effect that period architects used as an important element in their overall design composition (particularly impactful on the often somewhat austere Regency style homes).
From the first engineering meeting, the attention to detail provided by the team at Tradewood was impressive. The openings were measured, checked a second time and the ‘problem-child’ openings on the rear wall; all out of square due to the late 20th Century drop in the brick field and impossible to correct without completely rebuilding all of the wythes in the entire wall; were given a third visit to ensure optimum fit within some very funky openings. As good as their word, Tradewood delivered in the second week of December and the installation commenced.
Those funky openings continued to pose a challenge during the trim-out of the windows, however with patience, all of the original trim details were faithfully reproduced. This year, not only did the house’s interior see sunlight for the first time in decades, but we had candles in each window to wish our neighbours Yuletide blessings.
<<< Back to Rare, Unique and Storied

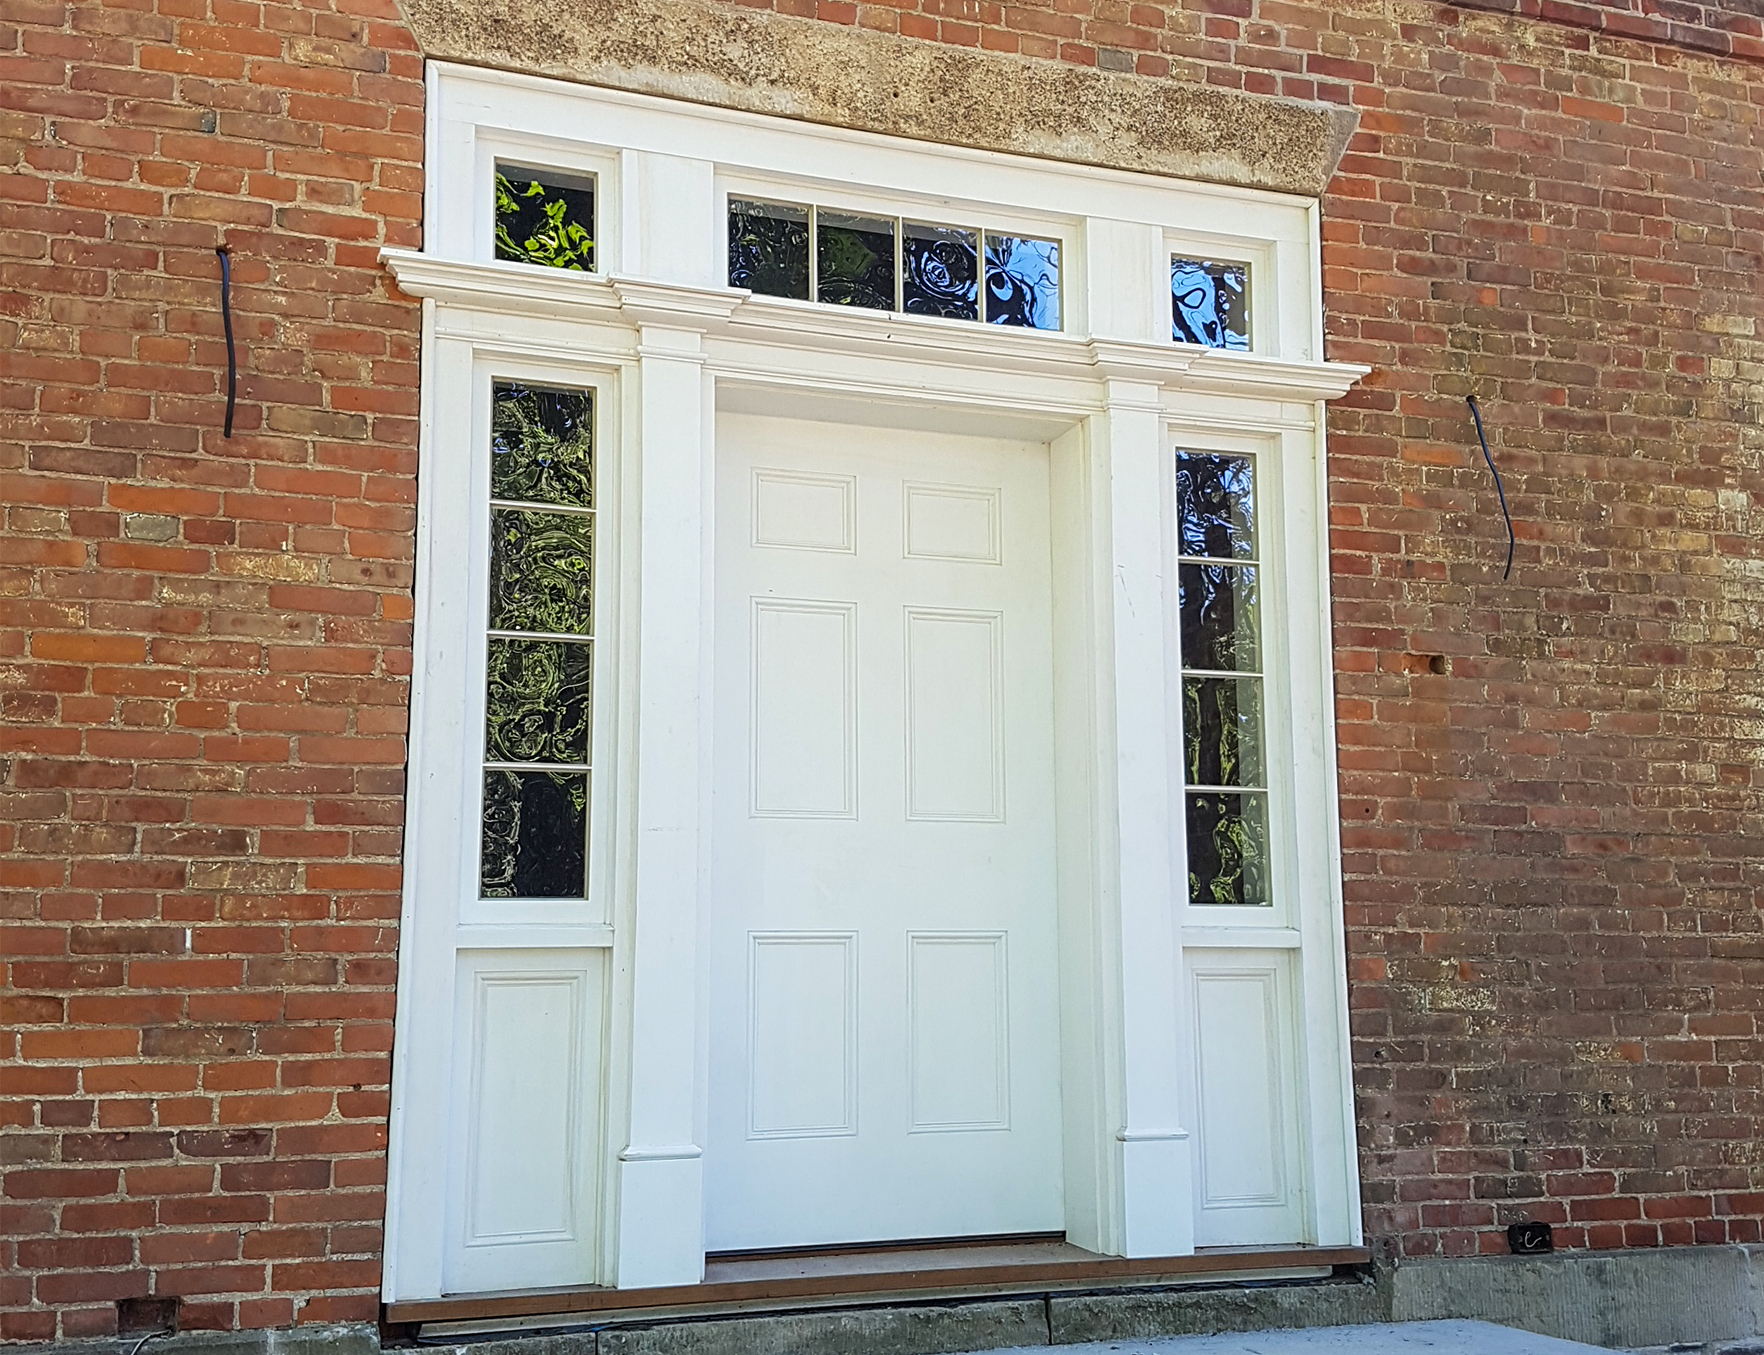
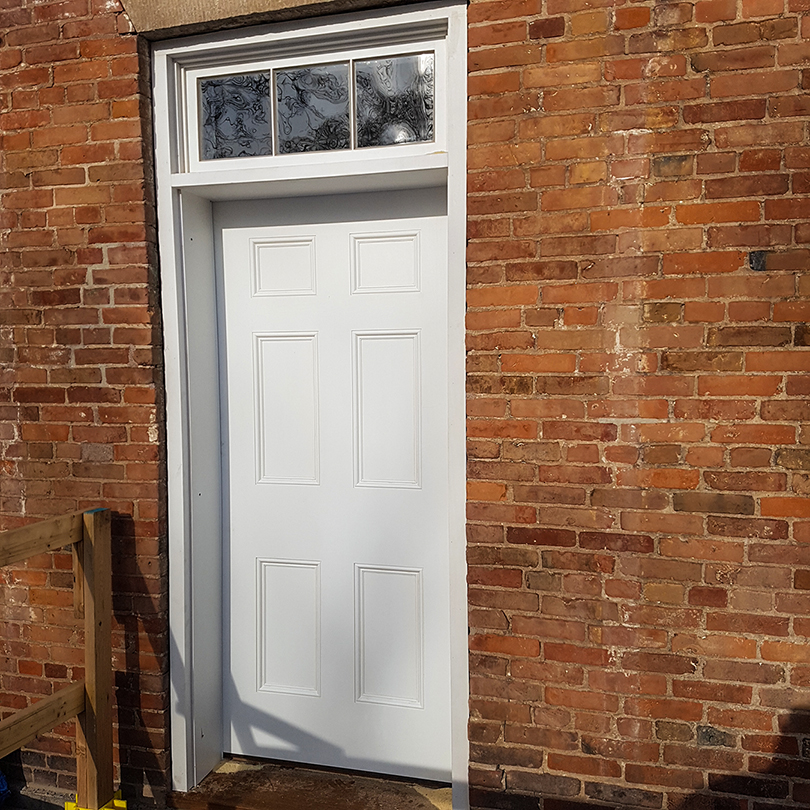
Recovering the Entry Statements
Consistent with every other part of the building envelope, both front and rear door openings were mere ghosts of their former glory. Neither of the original doors had survived. The badly rotted rear framing and transom light had been inappropriately replaced in the late 19th or early 20th Century. And, although in a similar deteriorated condition as the back door, the front door surround still retained enough of the original trimwork and moulding (albeit extremely degraded) to serve as reference for the development of reproduction drawings.
In the absence of any surviving door referents, we were forced to fall back on historical documentation to establish design criteria. Our next step was to seek out a period model by comparing all the original exterior doors on every circa 1817 to 1825 built house in Niagara-on-the-Lake to our criteria. We found one match on the front door of a nearby circa 1816 Neo-Classical. With the permission of the owner, careful measurements were taken and reproduction drawings were developed in correct scale/proportion to our openings incorporating all the moulding details to produce accurate reproductions.
The task of crafting these reproduction doors and surrounds was given over to Crowland Door & Sash and they came through with flying colours. Even the extremely rare reverse scallop moulding in the transom build-up was produced in exact match to the drawings.
Then, after these extremely heavy assemblies were delivered and installed, our trim carpenter completed the finish work to restore the original entry statements.
<<< Back to Rare, Unique and Storied

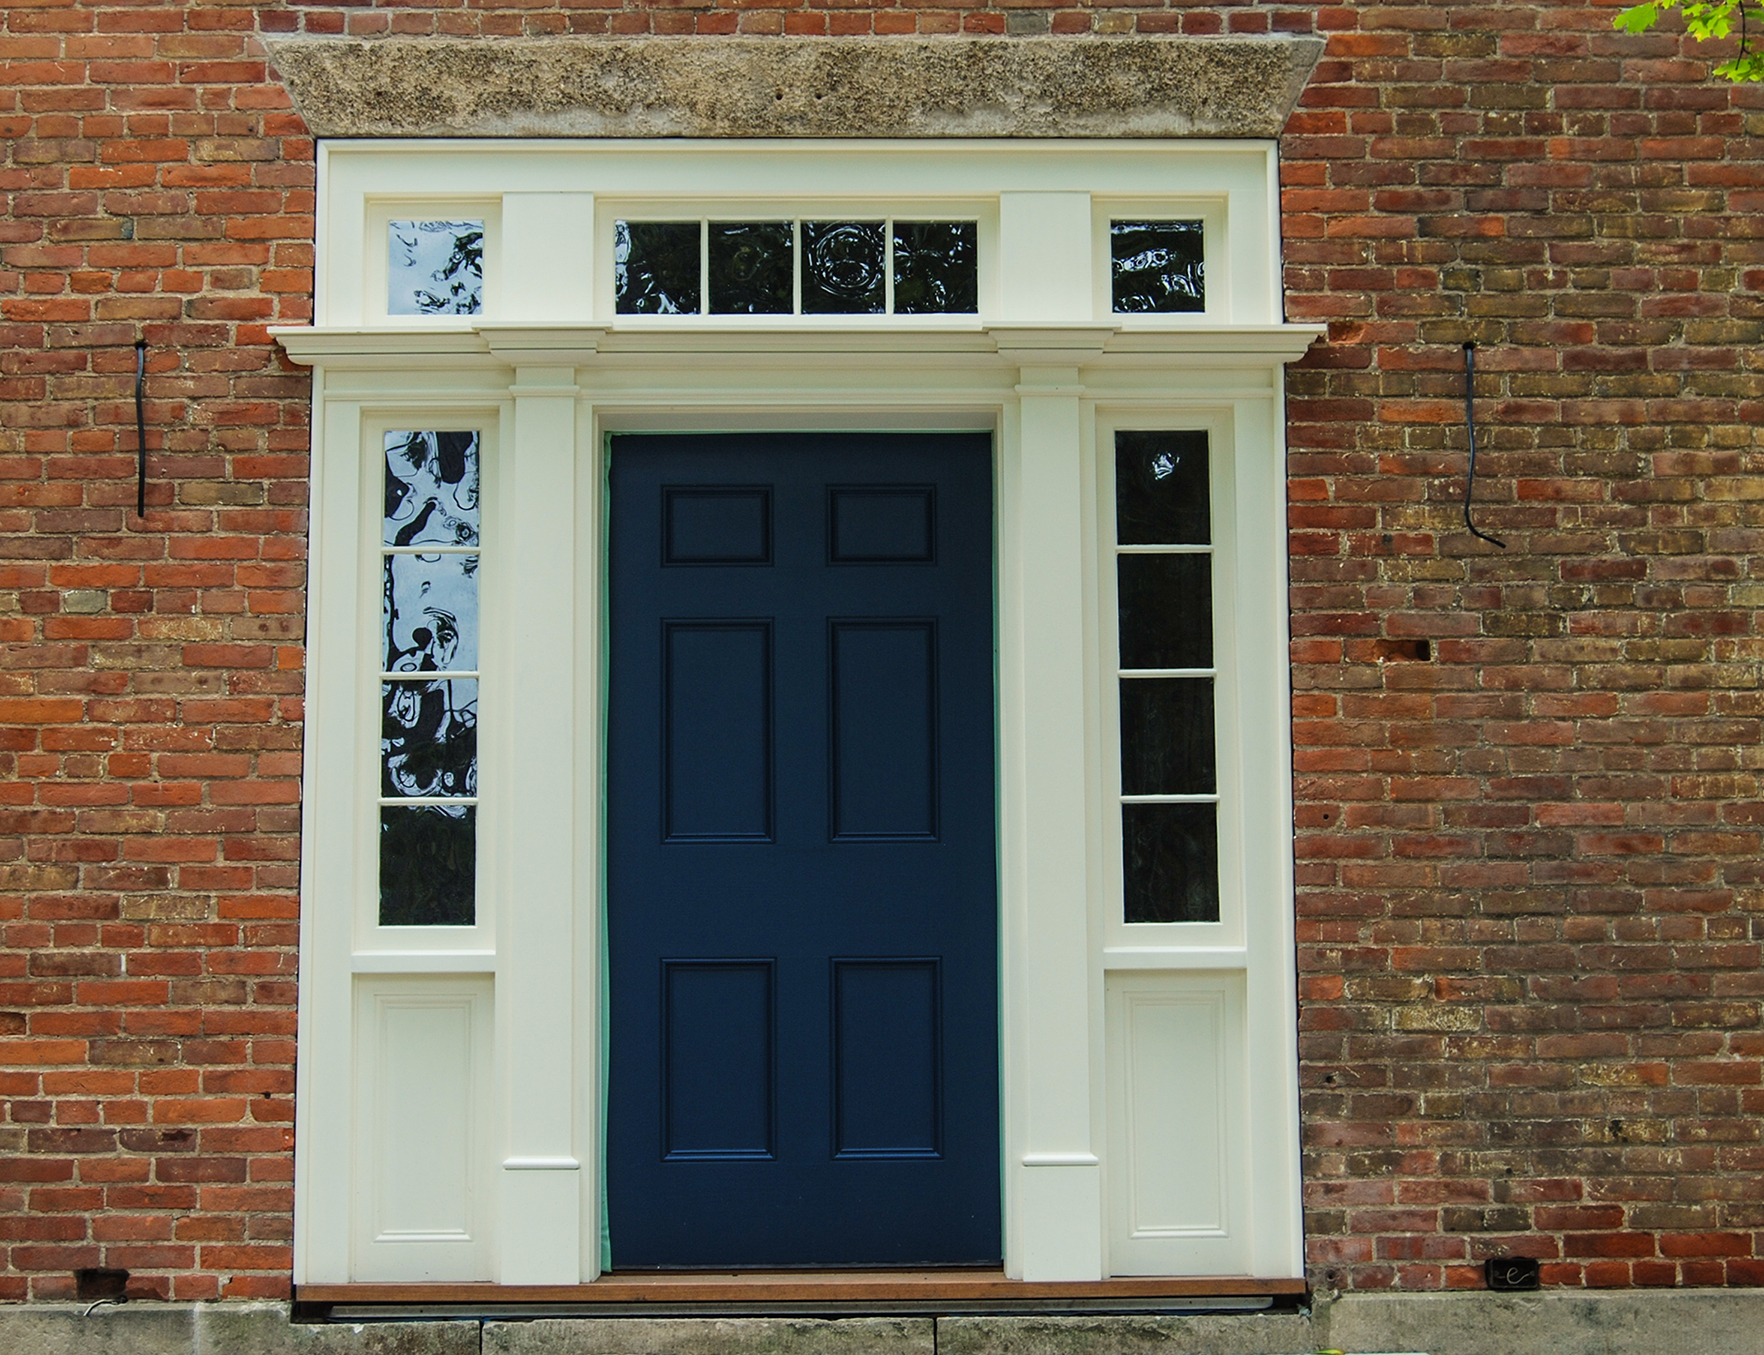
Colours
The introduction of zinc white in the mid 1800’s and titanium white in the early 20th Century forever altered the general perception of what a “white” paint colour is. Prior to this, paint compounders utilized chalk, lime powder (lime white) or lead flake (lead white) to produce “white” paint. Most commonly mixed with linseed oil, a thinner and hardener, this produced a cream or off-white tonal quality that was typically ‘warmer’ than the brilliant white of today.
Developed in Germany during the late 18th Century, Prussian Blue was the first modern pigment. In the early 1800’s this deep, rich blue that reads with a slight teal undertone was the most expensive paint of its day becoming “the” choice of the affluent for making a success statement on doors and shutters.
Since neither true Prussian Blue or the actual warm heritage white of the early 19th Century are commercially available, we engaged the services of expert colourist Sarah Cymba from Creek Road Paints to compound exact modern reproductions of these historic paints.
Our paint scheme followed circa 1820’s parameters: Prussian blue doors and shutters with all other paintable surfaces treated to Heritage White.
<<< Back to Rare, Unique and Storied
